%20(1).png)
If you're a React developer, chances are you already know how complicated it can get when working with global/shared states. Nonetheless, nowadays, there are two main ways to use this concept:
- Redux
- Context API.
It is essential to highlight that a learning curve is necessary to use both of these approaches in the best way possible. This view is based on the fact that its high complexity and verbosity come into focus whenever Redux is mentioned. This is even more pronounced when it comes to using Redux with Typescript.
However, in this article, the focus is on the Redux Toolkit, an official Redux library that makes it easy to configure and use all the resources offered by Redux. Suppose you've ever found Redux to be boring and challenging, I'm sure the explanations and examples I provide on how to implement Redux Toolkit with Typescript in React will help you reassess your position on the subject.
Table of Contents
- What is Redux?
- What is Typescript?
- What is Redux Toolkit?
- Why Redux Toolkit?
- Getting started with Redux Tool
- Conclusion
What is Redux?
Redux is an open-source JavaScript library for managing and centralizing the application state. It is most commonly used with libraries such as React or Angular for building user interfaces. Similar to (and inspired by) Facebook's Flux architecture.
Redux works well with applications that have a large amount of global state that is accessed by many of the application’s components. The goal of Redux is to provide scaleable and predictable state management.
Store
In Redux, a store is a container that manages the global state of your application.
As the single source of truth, the store is the center of every Redux application. It has the ability to update the global state and subscribes elements of an application’s UI to changes in the state. Rather than accessing the state directly, Redux provides functions through the store to interact with the state.
Actions
In Redux, an action is a plain JavaScript object that represents an intention to change the store’s state. Action objects must have a type property with a user-defined string value that describes the action being taken.
Optional properties can be added to the action object. One common property added is conventionally called payload, which is used to supply data necessary to perform the desired action.
Reducers
In Redux, a reducer, also known as a reducing function, is a JavaScript function that takes the current state of the store and an action as parameters.
Reducers calculate the new state based on the action it receives. Reducers are the only way the store’s current state can be changed within a Redux application. They are an important part of Redux’s one-way data flow model.
What is Typescript?
TypeScript is an open-source programming language developed by Microsoft. It is a strict syntactic superset of JavaScript and adds optional static typing to the language. Types provide a way to describe the shape of an object, providing better documentation and allowing TypeScript to validate that your code is working correctly. Since TypeScript is a superset of JavaScript, existing JavaScript programs are also valid TypeScript programs.
What is Redux Toolkit?
Redux Toolkit is the official Redux tool, opinionated, with batteries for efficient Redux development. It includes several utility functions that simplify the most common use cases of Redux, including:
- Store configuration.
- Setting dimmers.
- Immutable update logic.
You can also use it to create entire "slices" of state at once without writing any action creators or type of action manually.
Apart from the use cases, It also includes the most used Redux add-ons, such as Redux Thunk for asynchronous logic and Reselect for writing selector functions, such that you can use them right away. Essentially, the Redux Toolkit is intended to be the standard way of writing Redux logic, and it is highly recommended that you use it.
Key Redux Toolkit Functions
createSlice
This function makes it easy to define the reducer, actions, and the initialState under one object. Unlike the plain redux, you don’t need to use a switch for actions and need to define the actions separately. This function accepts an object as a name (i.e., the name of the slice) and the initial state of the store and the reducer, where you define all the reducers along with their action types.
configureStore
This function is an abstraction for the Redux createStore() function. It removes the dependency of defining reducers separately and creating a store again. This way, the store is configured automatically and can be passed to the Provider.
createAsyncThunk
This function simplifies making asynchronous calls. It automatically dispatches many different actions for managing the state of the calls and provides a standardised way to handle errors.
Why Redux Toolkit?
Firstly, the Redux Toolkit makes it easy to write good Redux applications. Additionally, it speeds up development by:
- Emphasizing adherence to best practices.
- Providing good default behaviors.
- Detecting errors.
- Making it easy to write simpler code.
Overall, the Redux Toolkit is beneficial to all Redux users, regardless of skill level or experience. This goes for whether you are a new Redux user setting up your first project or an experienced one who wants to simplify an existing application.
Getting Started with the Redux Toolkit
In this section, we will look at two main scenarios:
- Implementation within an existing project.
- Creating a new project.
1). Implementation Within an Existing Project
Step I
Add dependencies to your project:
Step II
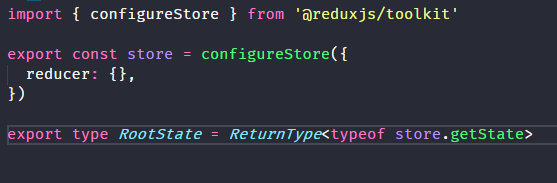
After the dependencies are installed, create a file for your Redux Store. Ex: src/store/index.ts
Within this file, you must use the “configureStore” function of the Redux Toolkit to create your store and later export it.
Note; configureStore: Function that provides simplified configuration options to combine all your reducers or add any middleware.
Step III
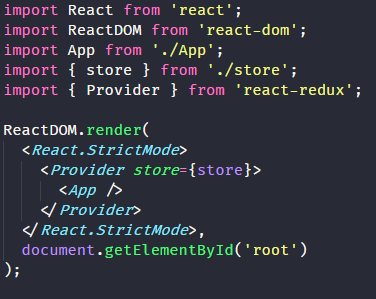
Provide the Redux Store to React:
Step IV
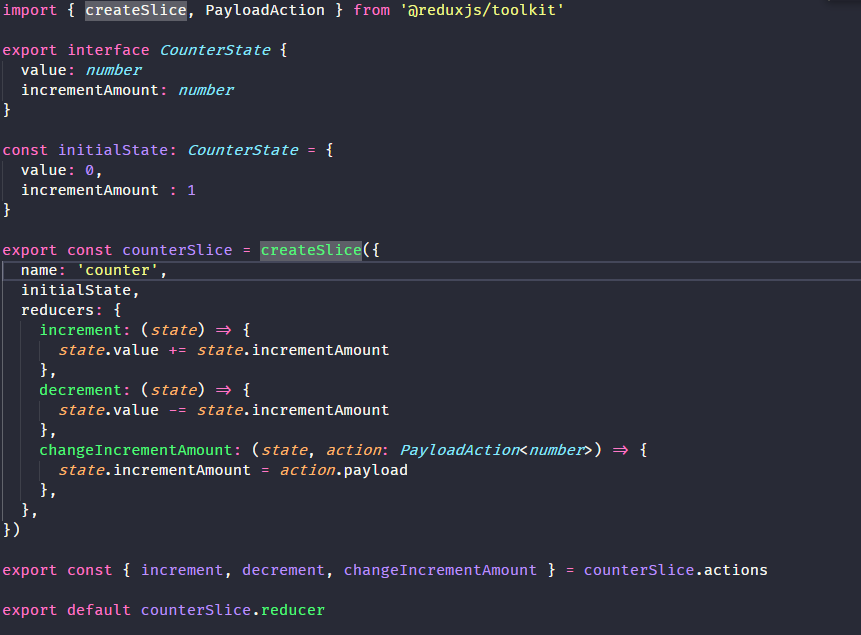
To create your reducers, use the Redux Toolkit's createSlice function.
You will need to set three properties in this function: name, initialState, and reducers.
- name: Used in action types (String)
- initialState: Initial state for the respective reducer (any)
- reducers: An object of reducer functions. Key names will be used to generate actions.(Object<string, function>)
Redux Toolkit allows us to write "mutating" logic in reducers. However, it doesn't actually mutate the state because it uses the Immer library, which detects changes to a "draft state" and produces a brand new immutable state based on those changes:
Step V
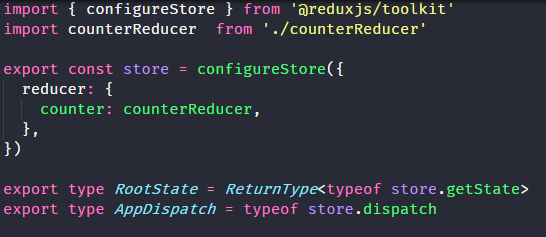
After creating the reducer, add it to the store:
Step VI
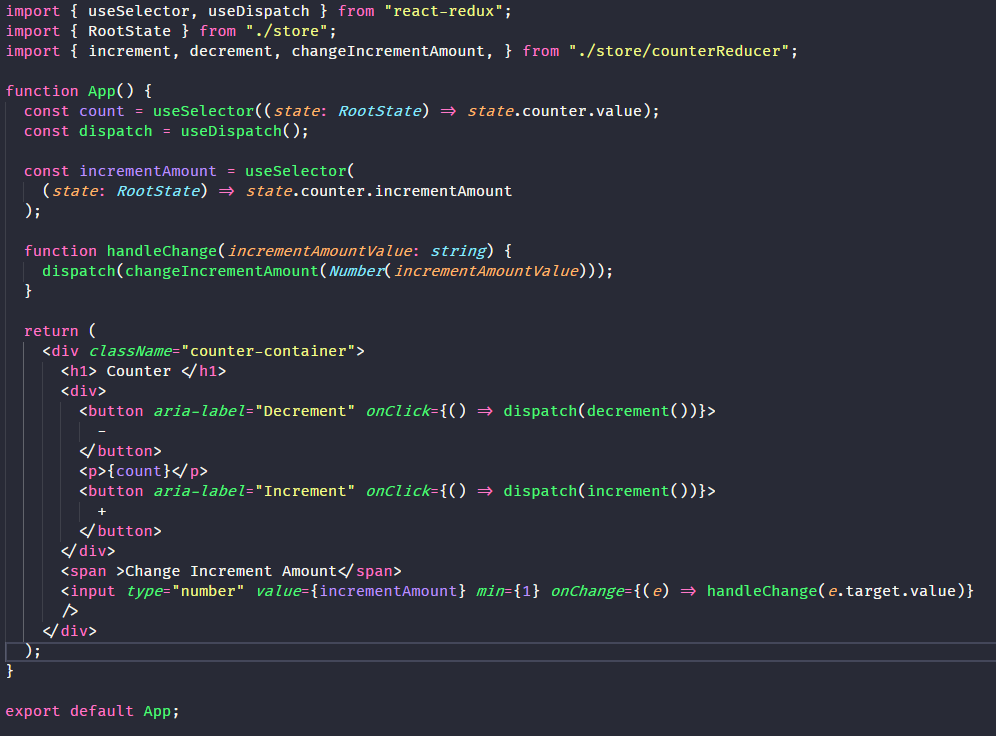
After that, you can use the redux state and Actions inside your components.
To read the data, use the "useSelector" function, and for dispatch actions, use the "useDispatch" function:
2). Creating a New Project
Creating a new project with Redux Toolkit is very simple. All you need to use is this command:
Behind the scenes, the CRA will be used to create your React application. In the end, you will have a similar structure to this:
- app/hooks.ts: While you can import RootState and AppDispatch types for each component, it's better to create typed versions of the “useDispatch” and “useSelector” hooks for use in your application. This allows you to import them into any component files that need to use the hooks and avoids potential circular import dependency issues.
- app/store.ts: To use the "configureStore" function, no extra typing is required. However, you will want to use RootState and Dispatch typing inside files that will need this reference. Therefore, these definitions are created and exported within the store.ts file.
- features/counter/counter.module.css: Simply the file of the stylizations of the component created.
- features/counter/counter.tsx: Main component file, where dispatch functions triggers and global state values are used. In addition to all Html structures being present inside it.
- counterAPI.ts: Inside is a dummy function to mimic an asynchronous data request.
- counterSlice.spec.ts: File where tests are created for the component’s main features.
- counterSlice.ts: The location where reducers and actions are defined and all the logic to manage the global state and control so that data consistency is always maintained
Conclusion
Redux Toolkit is an excellent tool to give productivity to applications that use Redux, and together with Typescript, your applications will be reliable and easy to maintain.
As much as everything can be built only with Redux, the complexity and verbosity make the development slower and require a greater learning curve.
You May Also Be Interested In:
What is DevSecOps: Top 5 Automation Tools for CI Pipelines
DevOps on AWS: Everything you Need to Know
DevOps Engineer Salary: GCP Guide for 2021
Kubernetes Salary Guide: A Detailed Comparison
Best Infrastructure as Code Tools (IaC): The Top 10 for 2022
More cost-effective than hiring in-house, with Nearshore Boost, our nearshore software development service, you can ensure your business stays competitive with an expanded team and a bigger global presence, you can be flexible as you respond to your customers’ needs.
Learn more about our services by booking a free consultation with us today!


